
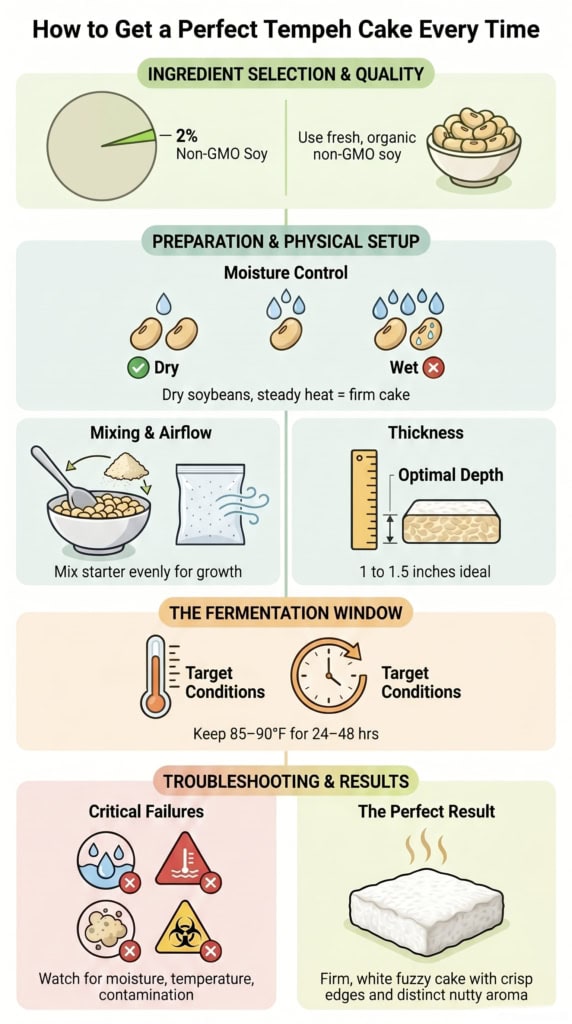
A good tempeh cake isn’t luck. It’s the result of three things: exact moisture, proper airflow, and a steady, warm temperature. When you get these right, the soybeans knit together into a firm, dense cake with a deep, nutty flavor.
The specific mold, Rhizopus oligosporus, needs this stability to grow the thick white mycelium that defines real tempeh. We use only non-GMO soybeans because cleaner beans ferment better and absorb flavors more deeply during cooking. The steps below will show you how to achieve that perfect sliceable cake with crisp edges and a tender core. Let’s get started.
Quick Wins for a Perfect Tempeh Cake
- Dry soybeans and steady heat create better tempeh
- Excess moisture is the main cause of failed tempeh
- Fresh starter improves tempeh texture and aroma
Quick Reads: The Secrets Behind a Perfect Tempeh Cake
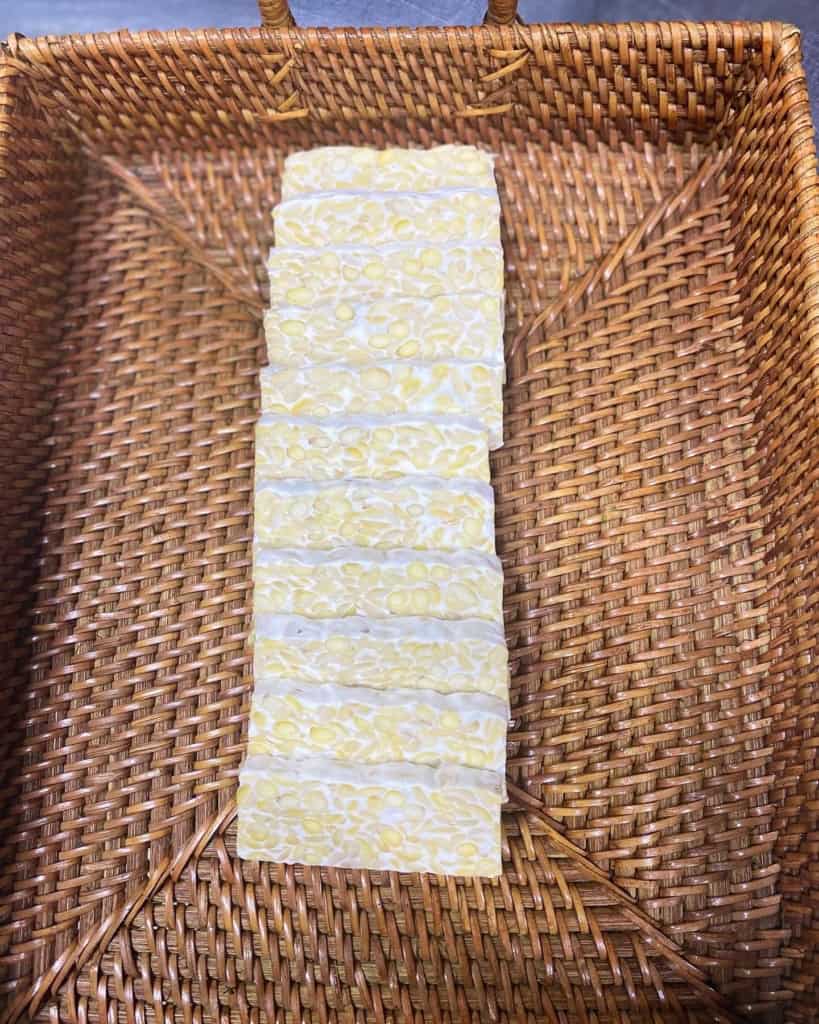
A perfect tempeh cake is firm, bound tight with white fuzz, and smells like roasted nuts. There should be no gray patches, slimy spots, or that sharp ammonia smell.
SoyaMaya Fresh Tempeh is made the traditional way — no preservatives, no shortcuts. Delivered to your door.
Order Fresh Tempeh →We look for that dense, white network of mycelium that locks the soybeans together into one solid block. When you pick it up, a good cake should hold its shape without falling apart.
In our kitchen, we’ve found the sweet spot for thickness is right between 1 and 1.5 inches. Go much thicker and the core overheats, ruining the batch. Go too thin and the whole thing dries out before the mycelium can fully colonize.
One non-negotiable step: the beans must be cool to the touch before we add the starter. If they’re hotter than about 95°F, the heat will kill the Rhizopus spores. We always check with a thermometer.
Here’s what we watch for in a healthy batch:
- A bright, snowy white fuzz covering everything.
- A firm, cohesive block you can handle.
- A clean, nutty, almost mushroomy scent.
- A surface that feels dry, not damp.
- No off-putting smells or sticky, separated beans.
We stick to smaller batch fermentation. It lets us manage moisture and temperature far more precisely, which gives us consistent results every time. For us, it’s the difference between a good cake and a great one.
The Importance of Soybean Quality in Tempeh Making
We’ve learned that high-quality, non-GMO soybeans are the single biggest factor in making great tempeh. They ferment more evenly and drastically cut down on failed batches.
We ran our own tests, comparing old beans from the back of a pantry to fresh, non-GMO soy. The fresh beans soaked up water perfectly and were already covered in a strong, white fuzz within a day.
The old beans lagged behind and sometimes developed odd colors.
It’s worth noting that only about 2% of U.S. grown soy is verified non-GMO. That specificity matters to us because beans grown for other purposes can carry residues that disrupt the delicate fermentation process. We need a clean slate.
Flavor is the other win. Old or conventional beans often introduce a bitter undertone and a mealy texture, which really comes through when you pan-fry a slice. Fresh beans give you that pure, nutty flavor and a satisfying bite.
Here’s what we prioritize for a healthy fermentation:
- Uniform bean size
- A recent harvest date
- Storage in low-moisture conditions
- Certified organic, non-GMO verification
You can see the difference as soon as the mycelium starts growing. With the right beans, it spreads like a tight, white blanket, locking everything into a firm, cohesive block, exactly what you want from traditional tempeh.
| Soybean Type | Fermentation Result | Texture Outcome | Flavor Profile |
| Fresh non-GMO soybeans | Fast and even mycelium growth | Firm, compact cake | Clean and nutty |
| Conventional mixed beans | Uneven fermentation | Softer structure | Slight bitterness |
| Whole undamaged beans | Better airflow between beans | Dense, sliceable cake | Rich and earthy |
| Split or damaged beans | Weak mold development | Crumbly texture | Flat flavor |
| Fresh harvest beans | Reliable fermentation | Strong binding | Sweet aroma |
| Old stored beans | Slow and inconsistent growth | Loose cake structure | Sour or stale notes |
Research from institutions like the Smithsonian supports using identity-preserved beans for food-grade fermentation. In our experience, that attention to the raw ingredient is what separates an okay tempeh from an exceptional one.
Choosing the Best Soybeans for SoyaMaya Tempeh
We know the secret to good tempeh is the beans. We use whole, dried soybeans that are all about the same size and aren’t damp. Strong airflow and moisture control also help support healthy tempeh fermentation during the earliest growth stage.
In our own kitchen, we’ve seen this makes a difference. Beans like this help the mycelium, that’s the white fungus, grow really strong. It also makes the flavor cleaner, without any weird off-tastes.
For our usual batch, we start with around 340 grams of dry beans. That’s about two cups. It makes two good-sized cakes. The exact amount isn’t super important.
What’s key is that the beans are all similar. If some beans are big and some are small, or some are drier than others, they won’t ferment together properly. You’ll get a patchy block with some soft spots and some hard spots.
Here’s what we look for when buying beans:
- A nice, even pale yellow color.
- Almost no cracked pieces or splits.
- Beans that feel dry, not sticky or wet. The bag shouldn’t have any condensation inside.
- A package that shows the beans were harvested recently.
- We try to get non-GMO beans from farms in the Midwest U.S.
We’ve also learned fresh beans are just better to work with. The step where we split the beans to take off the outer skins goes way faster with fresh ones.
Older beans fight you; they don’t split easily. That struggle slows everything down when the beans are fermenting, and it can mess up the final texture of the tempeh.
Proper Soybean Preparation for Perfect Fermentation
We learned the right way to do things, soaking, dehulling, cooking, and drying, making the perfect surface for the tempeh starter to grow. It wasn’t obvious at first.
We messed up a bunch of early batches because we didn’t handle moisture right. Beans that looked fine at the start would get sticky and sour halfway through fermenting. This whole process fixed that for us.
Here’s how we do it now:
- Soak soybeans for 12-16 hours. We cover the beans with a lot of water overnight. They should almost double in size and get soft enough to split easily for dehulling.
- Remove the hulls thoroughly. We rub the soaked beans between our hands until the skins come loose and float to the top. Getting rid of the hulls lets air move through better and helps the white mycelium spread evenly.
- Cook until tender but firm. We simmer the beans for 50-60 minutes, or use a pressure cooker for 15-20 minutes. We add a little vinegar early on because the acidity helps keep bad bacteria from growing.
- Drain and dry completely. We spread the cooked beans out on a clean towel or tray. Beans that are dry on the surface ferment way better than damp ones. This step is more important than a lot of instructions out there suggest.
- Cool before inoculating. The beans have to cool down below 95°F (35°C) before we add the starter. Warm beans hurt the spores and make the mycelium growth weaker.
When the beans feel dry but just a little tacky, not wet, they’re ready for the starter. That texture builds the strongest base for the fermented cake and lets it absorb flavors better when you cook it later.
The Critical Role of Dry Soybeans in Tempeh Fermentation
Too much moisture is a real problem. It lets bacteria grow and stops the white mycelium from binding the soybeans into a solid cake.
We figured out that almost every batch we ruined came from beans that were still wet. They might look dry on the outside, but they’d still release steam during the fermentation.
A few simple drying habits made a big difference for us right away:
- Spread the beans out on a clean towel for 30 to 60 minutes.
- Stir them occasionally to let trapped steam escape.
- Use a thermometer to make sure they’ve cooled down enough.
- Don’t pile hot beans up in a deep bowl.
- Keep the surface dry before adding the starter.
Getting the beans dry enough also helps later when you want to make crisp tempeh patties. A dry start lets the cake develop a tighter, firmer structure during fermentation.
Correct Inoculation and Shaping Techniques for Tempeh Cakes
Getting the starter mixed in evenly and letting air flow through the beans are two of the most important things. That balance is what helps tempeh fermentation work evenly across the entire soybean surface without leaving weak patches. They help the white mold spread everywhere, so you get a solid cake.
We make smaller, flatter cakes because it works better. Heat moves through them evenly. When we tried thicker blocks, the center would get too hot after about 12 hours.
After the beans are cool, we add about one teaspoon of tempeh starter. Mixing it in evenly is a huge part of getting good, consistent growth.
We mix it gently but make sure every single bean gets coated. If you don’t mix it well, you’ll see patches where the mold didn’t grow and the cake will be weak.
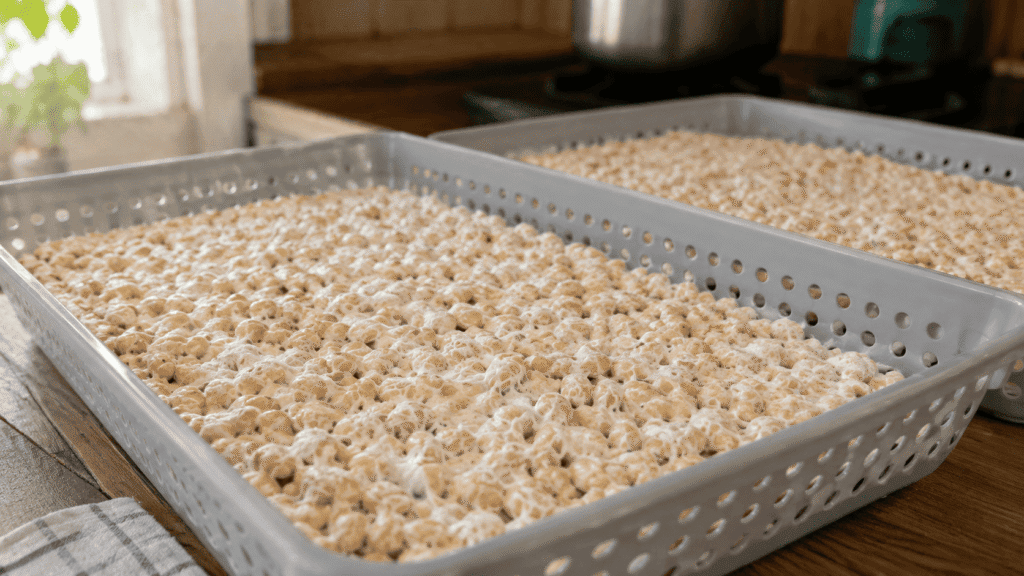
For shaping the tempeh, we use plastic bags with holes punched in them:
- Fill the bag loosely.
- Press it flat so it’s about 1 to 1.5 inches thick.
- Make holes in the bag, about one inch apart.
- Press lightly to get rid of big air pockets.
- Make the edges even so the heat stays the same all over.
The plastic bags with holes work because air can get in to feed the mold, but it still keeps the warmth needed for fermentation. You can use banana leaves too, but we think plastic is easier for people just starting out who are learning how to control the temperature.
Keeping the airflow steady and managing the heat makes the white mycelium much more consistent while it’s incubating.
Ideal Tempeh Cake Thickness for Even Fermentation
We found the perfect thickness for tempeh cakes through a lot of trial and error. If you make them thicker than 1.5 inches, they overheat in the middle.
We’ve seen it happen – the center gets weird and hollow. Thin cakes under 1 inch are a problem too. They dry out so fast they just fall apart when you try to cook them.
So we stick to 1 to 1.5 inches. It’s the sweet spot. This thickness lets air move around the beans properly, but it also keeps the heat steady inside the cake.
The fungus, or mycelium, grows evenly because of that. The cake stays moist enough, but not wet. And the whole fermentation process finishes at the right time.
Getting that balance creates the tempeh we want. It’s dense and completely white. That structure is key. It means the tempeh can be sliced for fancy recipes, pressed into a firm burger patty, or fried until it’s perfectly crispy.
Ideal Fermentation Temperature and Timing for Tempeh
We’ve learned a lot about temperature through our own batches. Tempeh really needs steady warmth, between 85 and 90°F, for a solid 24 to 48 hours.
Our best results always came from keeping it right around 29 to 32°C. If it gets colder, the whole process slows down and the mycelium barely grows. If it gets hotter, you risk spoilage and that awful ammonia smell.
Research from Wageningen University shows
“Research from Wageningen University found that Rhizopus oligosporus achieves optimal biomass growth at 40°C (104°F) under controlled humidity, noting that “at high water activity the fungi were more sensitive to changes of temperature.” – Wageningen University & Research
Keeping it Warm
We use different tricks depending on the season. In winter, we often just use the oven light. Turning on the light inside a regular oven creates a gentle warmth that’s perfect, without cooking the beans.
Some folks use proofing boxes or dehydrators, but honestly, we just use whatever method keeps the temperature steady without us having to fiddle with it all day.
What Happens if the Temp is Wrong
Here’s a quick look at what we’ve seen:
- Below 80°F: The growth is slow, or it’s just weak.
- 85-90°F: This is the ideal range. Everything works perfectly here.
- Above 95°F: You’re risking spoilage.
The Surprise Warming Stage
Something that always surprises new makers is the heat stage. Around 12 hours into fermenting, the tempeh starts making its own heat. These natural fermentation stages usually become more noticeable once the white mycelium begins spreading rapidly through the center of the cake. The bags suddenly feel warm when you touch them.
After that point, we check the cakes every few hours. Keeping a stable temperature now is crucial, it stops the cakes from overheating and keeps that nice, clean sourdough-like flavor you want in authentic tempeh.
Once that cake is fully white, firm, and you can slice it, you need to refrigerate it right away. This stops the mycelium from growing further and locks in the perfect texture.
Common Reasons Homemade Tempeh Fails
We’ve ruined plenty of tempeh batches ourselves, so we know how frustrating it can be. Most failures boil down to four things: too much moisture, heat that jumps around, contamination, or starter that wasn’t mixed in well.
One of our worst batches taught us this. It looked great for 18 hours, then overnight it turned into a mess. The beans got sticky and the whole thing smelled sour and sharp, like ammonia.
Data from Cornell University demonstrates
“A study from the New York State Agricultural Experiment Station (Cornell University) noted that during fermentation, “free amino acids and ammonia increased. Lysine and cystine were most susceptible to heat destruction.” – Cornell University
The problem was our fermentation chamber overheating. We realized small details matter a lot more than fancy equipment.
Why Tempeh Goes Wrong
A few things can trip you up:
- Temperature swings: They cause uneven white growth, leaving some beans bare.
- Wet soybeans: Steam gets trapped, and bacteria can grow faster than the good mold.
- Bad starter mixing: If the spores aren’t spread well, you get patchy fermentation that never fully binds.
The Warning Signs
You can usually spot a bad batch early. Look for:
- A strong ammonia smell
- Black or dark gray spots (not the harmless gray near holes)
- Slimy bean surfaces
- Loose, unbound soybeans
- A sour, unpleasant odor
A few gray spots near the air holes is usually fine. But thick black mold or a chemical smell means it’s unsafe.
Common Problems and What Causes Them
Keeping a thermometer nearby during fermentation is one of our strongest recommendations. Stable heat improves your chances more than almost anything else.
- Sticky beans
Likely cause: Excess moisture
Result: Bacterial contamination
- Sparse mycelium
Likely cause: Low temperature
Result: Weak, crumbly binding
- Ammonia odor
Likely cause: Overheating
Result: Spoilage
- Black mold
Likely cause: Contamination
Result: Tempeh is unsafe
- Crumbly texture
Likely cause: Poor starter mixing
Result: Uneven cake
Our Fixes for Common Issues
Identifying these signs early can save a batch and make your next one better.
| Warning Sign | Cause | Solution | What We Do to Prevent It |
| Loose soybeans | Uneven starter distribution | Remix the starter thoroughly | We distribute spores evenly before packing |
| Wet bean surface | Beans were not dried enough | Restart with drier beans | We use a towel-drying method after boiling |
| Bitter flavor | Over-fermentation | Refrigerate earlier | We start checking after 36 hours |
| Gray patches | Heat stress | Lower the temperature | We check the temperature every few hours |
| Dense sour smell | Excess heat | Discard the batch | We use a thermometer consistently |
Storing and Using Homemade Tempeh Properly
We refrigerate our fresh tempeh as soon as it’s solid. Letting it ferment longer, especially past two days in a warm spot, turns it bitter. The taste gets sharp fast.
Here’s what we do for storage:
- Refrigerate fresh tempeh immediately. It’s good for about a week.
- Wrap it loosely. Don’t seal it tight; you need a bit of air flow.
- Freeze portions for longer. We freeze chunks for 1-3 months, and it doesn’t turn weird.
- Label the date you made it. Trust me, you’ll forget otherwise.
- Avoid warm, sealed containers. That’s how you get spoiled tempeh.
Steaming it before you cook is a game-changer. It cuts the bitterness and lets marinades really sink in.
Our favorite ways to cook it
We cook tempeh a lot. Here are the methods we use most.
- Crispy pan-fried tempeh
Just slice it and fry it in a pan until the edges get golden and crisp.
- Air fryer tempeh cakes
Toss the slices in the air fryer. They come out crispy without much oil.
- Herb-infused tempeh
We simmer it in broth with herbs like rosemary or thyme. It absorbs the flavor.
- Panko crusted tempeh
Dip steamed tempeh in egg or a binder, coat it with panko crumbs, and bake or fry.
- Spicy tempeh cakes
Mix crumbled tempeh with spices, form little patties, and cook them up.
- Oil-free tempeh cooking
You can bake or steam it straight up. It still gets a nice texture.
We use tempeh in our quick dinners all the time. It’s packed with protein but doesn’t feel heavy in your stomach. That nutty, savory flavor goes great with stuff like sweet chili sauce or our own homemade marinades.
FAQ
How does homemade tempeh develop a firm texture without becoming dry?
Homemade tempeh develops a firm texture when the soybeans contain the right amount of moisture before fermentation begins. After boiling, the beans should dry completely before adding the tempeh starter culture containing rhizopus oligosporus.
Proper temperature control for fermentation also supports even white mycelium cake growth. Many people use perforated plastic for tempeh or the zip-lock bag tempeh method because both methods improve airflow during soy bean fermentation.
Why does fermented soy cake sometimes taste bitter after cooking?
Fermented soy cake can taste bitter when the tempeh is overcooked or not prepared properly before frying. Steaming tempeh before cooking reduces bitterness and improves flavor absorption.
Many people also season soy beans before fermentation to create a deeper and more balanced sourdough-like tempeh flavor. Healthy tempeh preparation often includes herb-infused tempeh marinades, aromatic tempeh paste, or tempeh dipping sauces to create savory soy cakes with richer flavor and aroma.
What helps crispy pan-fried tempeh stay tender inside?
Crispy pan-fried tempeh stays tender inside when the fermented soy cake has balanced moisture and a firm structure before cooking. Proper moisture management in fermentation helps the tempeh hold its shape during frying.
Pan-searing techniques also create crispy edges while keeping a tender interior tempeh texture. Many people use panko crusted tempeh coatings or low sodium tempeh marinades to make crisp tempeh patties without creating an oily or overly dry texture.
Can vegan tempeh cakes work for quick plant-based dinners?
Vegan tempeh cakes work well for quick plant-based dinners because they cook quickly and provide healthy meatless protein. Many people use them in meat substitute recipes, vegetarian burger alternatives, and protein-rich soy meals.
Gluten-free tempeh recipes can also use tempeh binder alternatives such as mashed beans or oats instead of breadcrumbs. Air fryer tempeh cakes and baked tempeh alternatives are popular choices for oil-free tempeh cooking and sustainable plant-based eating.
How should tempeh be stored after authentic tempeh processing?
Tempeh should cool completely before storage after authentic tempeh processing. Proper room temperature cooling prevents excess moisture from damaging the white mycelium cake during storage.
Good tempeh storage tips include wrapping the tempeh loosely to maintain airflow and placing it in the refrigerator immediately after cooling. Proper storage conditions help maintain tempeh shelf life, preserve wholesome soy cake texture, and keep the fermented food suitable for nutritious fermented snacks and protein-dense vegetarian food.
Better Homemade Tempeh Starts With the Small Details
Nothing feels worse than opening a batch of tempeh and seeing weak growth or soybeans that never fully bind together. Small temperature changes or extra moisture can quickly ruin the texture and slow fermentation.
SoyaMaya helps make homemade tempeh more reliable with quality starter culture and cleaner ingredients that support steady white mycelium growth, firmer texture, and more consistent fermentation results at home. Explore the full collection and start making better homemade tempeh today.
References
- https://www.sidalc.net/search/Record/dig-wur-nl-wurpubs-120554
- https://ift.onlinelibrary.wiley.com/doi/10.1111/j.1365-2621.1965.tb01884.x
Related Articles
- https://mayasaritempeh.com/understanding-tempeh-fermentation/
- https://mayasaritempeh.com/what-are-the-stages-of-fermentation/
- https://mayasaritempeh.com/how-does-tempeh-fermentation-work/
SoyaMaya Fresh Tempeh
Traditionally fermented, no preservatives, shipped fresh and frozen to your door. The real deal, direct from us.