Start with cooked soybeans and a pinch of starter culture. The real magic is the mold Rhizopus oligosporus, which grows a dense, white network of threads that binds the beans into a firm, nutty cake. This fermentation isn’t just about preservation, it’s a complete biochemical change.
The mold enzymes break down proteins and starches, making the nutrients inside far easier for your body to absorb. The result is a versatile, high-protein food you can make at home. Curious about the science behind it and how to get perfect results every time? Let’s get into the details.
Quick Reads: Tempeh Fermentation Essentials
- Tempeh’s firmness comes from Rhizopus mycelium.
- Perfect beans, warmth, airflow ensure good ferment.
- Fermentation boosts protein, reduces anti-nutrients.
Starter Culture as Your Tiny Factory
That little packet of starter is the whole secret. It’s not just dust. It’s a ton of sleeping mold spores. When you sprinkle it on warm, cooked soybeans, you’re waking them up. They start growing immediately.
SoyaMaya Fresh Tempeh is made the traditional way — no preservatives, no shortcuts. Delivered to your door.
Order Fresh Tempeh →We use a specific mold called Rhizopus oligosporus. It’s safe to eat and likes it warm, just like we do. It grows really fast, which is good. It takes over the beans before other germs can move in and ruin things.
Some people think it even makes its own stuff to fight bad molds. You could try to catch mold from the air, but buying a starter is the smart, easy way. It works every time.
Getting the Beans Ready
You have to use soybeans. Cooking them first is a must. This does two important jobs and forms the base of good tempeh processing methods:
- It softens the beans so the mold can get inside them.
- It kills any other germs sitting on the bean skins.
After you cook them, the beans have to be the right kind of wet. You drain them, then dry them off really well with clean towels. They should feel sticky, not wet. If they’re soggy, the mold drowns. If they’re bone dry, the spores won’t wake up. Sticky is perfect.
Mixing and Packing
When the beans are warm and sticky, you mix in the starter powder. Try to get a little bit on every single bean.
Next, you pack the beans into something that can breathe. A plastic bag with tiny holes poked in it works great. Don’t pile them too high. Spread them out so they’re only about an inch thick. This lets air in so the mold can grow and turn everything into one solid white block.
Doing It Step-by-Step
Here’s how you do it, start to finish:
- Soak dry soybeans in a big bowl of water overnight.
- Cook them until they’re soft but not falling apart.
- Drain them and dry them completely with towels.
- Mix in the starter while the beans are still warm.
- Put the beans in your breathable bag or tray. Keep the layer thin.
Making tempeh is like growing something. You get the beans ready, add the starter, and keep it warm. If you do it right, you’ll see a pile of beans turn into a solid, nutty cake. It’s simple, but you have to watch three things: cook the beans right, get the wetness right, and keep it warm. Do that, and you’ll make your own tempeh.
Achieving the Perfect Tempeh Temperature
The temperature is where most new tempeh makers run into trouble. Our mold, Rhizopus oligosporus, is pretty picky about its climate. It wants to feel like it’s in the tropics.
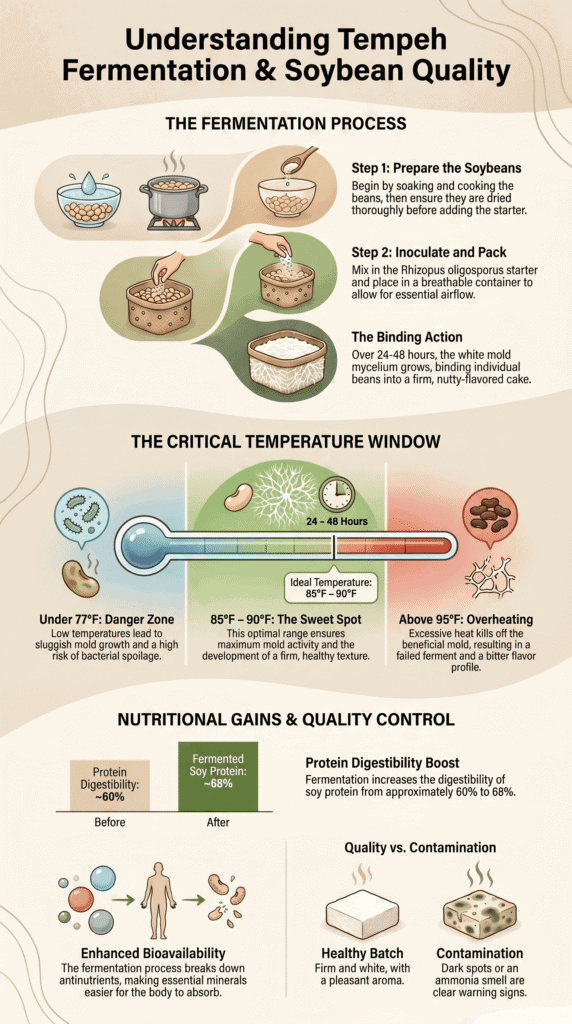
We’ve found the perfect range is between 85°F and 90°F (29-32°C). Keep it there, and the mold gets to work, happily spreading its white, thread-like roots and binding everything into a solid cake within a day or so, which is one of the key signs of high quality tempeh forming properly.
Go outside that range, and things go wrong. If it’s too cold, let’s say, under 77°F, the growth slows way down.
It becomes a race, and other unwanted microbes can win. That’s when you might open your container to a slimy or foul-smelling mess. That batch is finished.
| Temperature Range | What Happens | Result in Tempeh |
| Below 77°F (25°C) | Mold grows very slowly | Risk of contamination and failed batch |
| 85-90°F (29-32°C) | Optimal growth of Rhizopus oligosporus | Strong, white mycelium and firm cake |
| 90-95°F (32-35°C) | Growth becomes stressed | Uneven fermentation, early spore formation |
| Above 95°F (35°C) | Mold may die or overheat | Bitter taste and spoiled tempeh |
Too hot is another issue. Push past 95°F, and you risk killing the mold outright. Even if it survives, the heat stresses it, which can cause it to produce spores too early.
You’ll see this as black or grey spots. While it’s usually safe to eat, it makes the tempeh taste unpleasantly bitter.
Here’s the tricky part: the fermentation process creates its own heat. We might start a batch in our oven with just the light on, set at a perfect 88°F. But by the 12-hour mark, the tempeh cake itself is often generating warmth.
We usually have to turn the external heat source off, or even vent the container a bit, to stop it from cooking itself. A simple thermometer left in the incubator is our guide here. We check it a few times, especially in those later hours.
We’ve tried all sorts of setups to keep that steady warmth. An oven with only the light bulb on works well. So does placing the container in a cooler next to a sealed jar of hot water.
The goal isn’t to blast it with heat, but to create a stable, cozy pocket of air. You’re building a tiny, perfect environment. The mold handles the rest, breathing and transforming the beans.
You can actually watch it happen. For the first half-day, not much seems to go on. Then, a faint white fuzz appears.
After a full day, the binding is obvious. If you touch it, the whole cake feels warm, a sure sign the process is working.
From Bean to Cake: Stages Unfold
Watching tempeh grow is the cool part. You can actually see it change. Knowing what to look for tells you if you did it right.
First, there’s a quiet time. You mix the starter with warm soybeans and put it in a container. For the first half a day or so, nothing happens.
It just sits there. But the tiny mold spores are waking up. They’re starting to grow little threads you can’t see yet.
Then you see the first sign. A thin, white, cobwebby fuzz appears between the beans. That’s when things get moving. Over the next 12 hours, that white fuzz gets thicker.
It starts holding the beans together like glue. If you poke it gently, it should feel firm, not mushy. It smells clean and simple, like mushrooms or raw nuts.
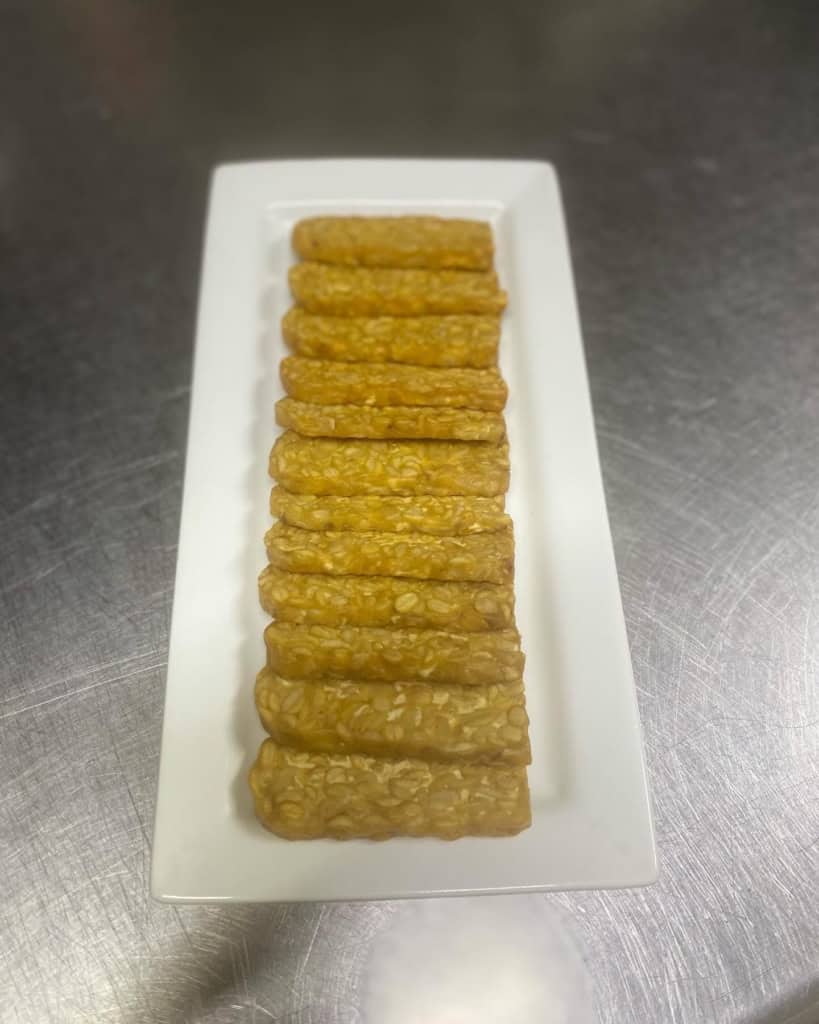
Finally, it all comes together. The white fuzz becomes a solid, tight blanket around every single bean. The whole block feels firm and ready. This is what gives tempeh its special, sliceable texture.
The whole show takes about one to two days. You have to stop it at the right time. If you wait too long, the white mold starts making spores and turns grey or black. That makes the tempeh taste bitter.
So we take it out of the warm spot when it’s perfectly firm and white, and pop it in the fridge. The cold stops the mold right where we want it.
So, why bother making it?
Because it’s better for you than plain beans.
Research from Chulalongkorn University shows
“We also found that protein digestibility of soybean tempeh and soybean tooa-nao increased from 59.65% to 68.18%. These results suggest that the nutritive value of protein in soybean residue was improved by the fermentation process.” – CUIR
The mold is doing some of the digestion for you before you even eat it.
- Easier on your stomach: The mold’s enzymes break down the hard-to-digest stuff in the beans. That’s why many people get less gas from tempeh than from tofu or whole beans.
- Your body gets more minerals: Beans have something called phytates that lock up minerals like iron and zinc. Fermentation breaks these phytates down, so your body can actually use the good stuff.
- A great protein: It’s a complete protein that your body can absorb really well.
Guide to a Flawless Batch at Home
You can absolutely make tempeh at home. It’s not difficult, but it does ask for some patience. Most of the work is waiting. Start with the beans. Get whole, fresh soybeans. A lot of home cooks look for organic or non-GMO beans, but it’s not a strict rule.
Insights from A.B. Tawali & G. Schwedt indicate
“Using the determination of soluble iron after extraction with simulated gastric and intestinal juices, it was found that. The availability of iron decreases after cooking and steaming, but then increases again after fermentation.” – Nahrung
The Cooking Step
This is where things can go wrong. You need to cook the beans until they’re tender. Not soft and mushy, and definitely not splitting open. After draining them, you have to let them steam off until the surface is bone dry. Every last drop of water needs to evaporate. If the beans are wet when you add the starter, you’ll likely grow bacteria instead of the good, white mold you want.
Inoculation and Setup
Next, you inoculate. Use about half a teaspoon of tempeh starter per pound of cooked beans. Mix it in thoroughly until each bean has a fine, white dusting on it.
The container you use is important. The mold needs oxygen to breathe, but you can’t let the beans dry out completely.
- We’ve had good results with plastic bags that have tiny holes poked in them.
- A glass baking dish with a lid placed loosely on top also works well.
No matter what you use, keep the layer of beans under an inch thick. This lets heat escape and allows air to reach the center. A sealed container will suffocate the mold, and that’s when you get a failed batch.
The Incubation Period
Find a warm spot for it. Don’t just set it and forget it for two days.
- Check it after about 12 hours. It should smell clean and beany, maybe a little yeasty.
- By 24 hours, you should see a white fuzz starting and feel warmth coming from the cake itself.
Troubleshooting Contamination
If you see black or green spots, slime, or smell something foul like ammonia, it’s contaminated. Throw that batch out, clean everything meticulously, and start over. This usually happens for one of three reasons:
- The beans were undercooked.
- There was too much water left on them before inoculating.
- The temperature during incubation was too hot or too cold.
When it works, you get a firm, warm cake. It’s solid but still has a slight springiness to it. The whole block is knitted together with white mycelium. That’s your signal of success. Let it cool completely, then slice it up to cook, or store it in the fridge.
FAQ
How do I control tempeh fermentation temperature at home?
Controlling tempeh fermentation temperature at home requires keeping a steady range between 85 F and 90 F. This range supports strong growth of Rhizopus oligosporus during tempeh fermentation.
Use simple temperature control methods such as an oven light or insulated box. Because exothermic fermentation tempeh produces heat, you must check regularly to prevent overheating.
What are the main stages in the soybean fermentation process?
The soybean fermentation process begins with soaking soybeans for tempeh for the correct soaking time. Next, continue with cooking soybeans for tempeh by boiling or steaming soybeans tempeh.
After drying to proper soybean moisture content, add tempeh starter. During tempeh fermentation stages, white mycelium grows and forms a firm, sliceable tempeh cake.
Why does my homemade tempeh develop dark spots or ammonia smell?
Dark spots tempeh and ammonia smell tempeh usually indicate problems in tempeh fermentation conditions. These issues often result from excess moisture, poor aeration tempeh, or high tempeh fermentation temperature range.
In rare cases, contamination such as Aspergillus flavus contamination may occur. Use perforated bags tempeh and maintain proper airflow to reduce the risk of tempeh spoilage.
What makes tempeh a healthy plant-based protein option?
Tempeh is a fermented soyfood that provides high tempeh protein and valuable tempeh health benefits. The soybean fermentation process reduces soy trypsin inhibitors fermentation and supports soy phytate reduction.
These changes improve soybean digestibility tempeh. Tempeh also contains soybean isoflavones tempeh and supports plant based protein tempeh diets such as vegan tempeh or vegetarian tempeh meals.
How can I ensure food safety during tempeh making at home?
Ensuring food safety tempeh requires careful control at every step of tempeh making. Start with clean, high-quality non GMO soybeans tempeh or organic tempeh sources.
Follow proper soybean prep for tempeh and maintain stable tempeh fermentation conditions. Use a reliable tempeh culture with Rhizopus oligosporus, keep equipment clean, and monitor for off odors tempeh or signs of a failed tempeh batch.
From Curiosity to Your Own Tempeh
You read about fermentation, but the real shift comes when beans fail to bind or smell off, leaving you guessing what went wrong. It’s frustrating when you expect a firm, nutty cake and get another failed batch instead. That’s where SoyaMaya helps, offering a simple, reliable starting point so you can focus on learning by doing and improving each batch with confidence over time.
Exploring more SoyaMaya comes in as a simple way to get steady results without overthinking every step.
References
- http://cuir.car.chula.ac.th/handle/123456789/12478
- https://agris.fao.org/search/en/records/64775df0bc45d9ecdbc2a9a2
Related Articles
- https://mayasaritempeh.com/understanding-tempeh-processing-methods/
- https://mayasaritempeh.com/what-makes-tempeh-high-quality/
- https://mayasaritempeh.com/what-is-the-difference-in-texture/
SoyaMaya Fresh Tempeh
Traditionally fermented, no preservatives, shipped fresh and frozen to your door. The real deal, direct from us.